Contents
Introduction
It’s time to set up your MacBook. Here’s is a no-frills setup for development.

Photo by Jonny Caspari on Unsplash
System Settings
Each of these settings can be found under the Apple System settings. For each of these, select or set the following:
Dock
- Show recent applications in Dock (OFF)
- Battery (Show percentage)
Spotlight
- Tick the following:
- Applications
- Calculator
- Contacts
- Contacts
- Conversion
- Definition
- Documents
- Events & Reminders
- Folders
- System Settings
Keyboard
- Key repeat rate: Fast (max)
- Delay until repeat: Short (max)
Trackpad
- Delay until repeat: Short (max)
Trackpad Gestures
- Tap to click (tick)
- More Gestures
- Swipe between pages (OFF)
- Swipe between full-screen applications (Swipe Left or Right with Three Fingers)
- Mission Control (Swipe up with Three Fingers)
Notes
- Edit > Spelling and Grammar
- Correct Spelling Automatically (untick)
Finder
- View
- Show Path Bar (tick)
- Right-click in Finder
- View options
- Show Library folder (tick)
- View options
Or for Finder if you prefer setting flags in the terminal:
# show Library folderchflags nohidden ~/Library
# show hidden filesdefaults write com.apple.finder AppleShowAllFiles YES
# show path bardefaults write com.apple.finder ShowPathbar -bool true
# show status bardefaults write com.apple.finder ShowStatusBar -bool true
# stop hold-key for proper vim usagedefaults write org.vim.MacVim ApplePressAndHoldEnabled -bool false
Terminal
Terminal emulator: Ghostty Reasons:
- Very snappy
- Very cool
Probably the fastest terminal out there with a native UI and in-built GPU acceleration.
Ghostty by Mitchell Hashimoto via Ghostty.org
If you’re still not convinced, then note that Ghostty gets around 500 FPS on this classic terminal emulator tester via DOOM fire. You can try with yours and see the difference. Also, see here to see the output speed of plaintext English IO and then Japanese on Ghostty, which is about 10x faster than iTerm2 and faster than Alacritty.
Also, the Ghostty is the personal project of Mitchell Hashimoto, who is a very cool guy - go check him out: https://mitchellh.com.
Sudoless access
Since this is your personal machine we don’t want to get prompted for a password for sudo-required operations. Add the following by typing sudo visudo. Note - this is the safe command, do not edit the sudo file directly or you can lock yourself out of your system. For the following, ensure that you add the line after the line that says includedir...
#includedir /etc/sudoers.d
username ALL=(ALL) NOPASSWD: ALL
Package Manager
In Linux, say Ubuntu, you have the apt package manager. This allows you to install software from your CLI, which works across your system. MacOS does not come with a package manager by default, so we will install Homebrew to fix that. Either head to the website to find the installation instructions, or you can use the following:
/bin/bash -c "$(curl -fsSL https://raw.githubusercontent.com/Homebrew/install/HEAD/install.sh)"Update Homebrew
Running the below commands makes sure brew is up to date. Furthermore, running this for the first time on your system will install the apple developer tools (or Xcode utilities) that are required for a developer setup. Homebrew handles this automatically now so no extra detail on that is needed.
brew update && brew upgradeInstall GUI apps
Homebrew can also install GUI applications to MacOS, so you don’t have to download install files from various websites and do the weird ‘drag and drop the application icon to this folder’ thing. To do this, use the --cask flag. Note that not all software supports this but the following list is good to go.
FYI rectangle (below) is an awesome open-source tool for windows resizing and snapping to borders.
brew install --cask \ firefox \ spotify \ visual-studio-code \ rectangle \Shell
For my shell I use Zsh. This is the vanilla shell for MacOS for some time now, so it will be present out of the box.
To confirm you can run:
echo $0The output for zsh will be -/bin/zsh. From here I would go ahead and install the Oh My Zsh! framework, shortened as oh-my-zsh, which is open source and provides sensible defaults and extensive plugin support for zsh.
sh -c "$(curl -fsSL https://raw.githubusercontent.com/ohmyzsh/ohmyzsh/master/tools/install.sh)"Plugins
You get access to a bunch of nifty plugins that you can utilise by including the name in your plugins list in your ~/.zshrc file. I’ll be adding some to my CLI prompt (below) but in the meantime you can check out the full list of plugins available here (link). Two plugins that I include in my config are: git and battery.
In your ~/.zshrc, find the line with plugins and edit as follows:
plugins=(git battery)
source $ZSH/oh-my-zsh.sh
This will give you access to seeing your git information as well as battery status and percentage in your cli, respectively. More on that in the prompt section below.
CLI Prompt
So we’ve discussed running commands and also the actual shell being used, but let’s take a step back and talk about the visuals of your prompt too. This is of course totally subjective and up to you if you want to change, but since a lot of development is spent on the terminal, I like to talk about it.
Specifically, the shell prompt is the text you see on your terminal in front of where you type. For a new MacBook, the prompt is likely of a default format including your username on the left, and some combination of firstname and hostname (computer’s name) on the right of the @ symbol. For example:
aleye@Alexs-MacBook-Pro ~ %Now if you installed oh-my-zsh like in the earlier step, it will transform into something like this - the prompt for the default ohmyzsh theme called robbyrussel:
➜ ~Boooooring!
For fun, I like to change this to a sushi prompt, where we have a 🍣 on the left. The reason being that I love sushi. I might need to make a post about sushi just because. So anyways, if you are interested in this type of prompt personalisation, we first need to understand the prompt syntax and where it comes from. When we installed oh-my-zsh, it uses a specific theme called robbyrussel with the theme information defined in ~/.oh-my-zsh/themes/robbyrussell.zsh-theme.
# Default oh-my-zsh promptPROMPT="%(?:%{$fg_bold[green]%}%1{➜%} :%{$fg_bold[red]%}%1{➜%} ) %{$fg[cyan]%}%c%{$reset_color%}"PROMPT+=' $(git_prompt_info)'Let’s update that to something more fun. In your ~/.zshrc at the bottom:
PROMPT='🍣 %{%}%c%{%} $(battery_pct_prompt) $(git_prompt_info) 'Note that to get the two dynamic elements of battery_pct_prompt and git_prompt_info, you will need the battery and git plugins included, respectively, as mentioned in the plugins section above.
This will give you:
🍣 my-site ⚡️ git:(master) ✗We have the git branch and information there as well which is super handy - it will only appear when you are in a git repo. Also, now we have the battery percentage which updates on each command (percentage is shown if not plugged in, otherwise it is the ⚡️ symbol). I wanted to show the battery plugin more as an fyi, but I have that particular plugin removed in my daily terminal.
Leave the Username/Hostname alone!
You might want to stick with the username and/or hostname that ships out of the box. For example this is the default zsh prompt before oh-my-zsh gets applied:
echo $PROMPT%n@%m %1~ %#Here, the %n is your username, and %m is the part we are interested in - that combo of firstname and computer name. More specifically, you can find the value of your MacBook names using the following GET commands:
# Primary hostname, or FQDNsudo scutil --get HostName
# Bonjour hostname (local network)sudo scutil --get LocalHostName
# Computer name (user-friendly)sudo scutil --get ComputerName
Now, if you google around you’ll find a ton of people telling you to update your LocalHostName, HostName or similar to get your preferred hostname in your cli prompt. Even, you can set the computer’s name in the Apple Settings. However, this might impact your system in unexpected ways, such as if you are performing remote SSH or other network-related tasks. In this case, an emoji may not be accepted due to complexity of the characters. The less destructive method, as we saw earlier is to edit the prompt itself.
Startup Messages
Two recommendations I have are, neofetch and cowsay. The latter is a personal favourite, and depends how silly you are feeling on the day. But let’s start with a more common startup.
If you want your terminal to display system settings and a nice graphic of the OS, you can use the open-source neofetch package.
brew install neofetchThen in your ~/.zshrc:
neofetchThat’s it. The neofetch package will do the rest. So everytime you login, you’ll get something like this:
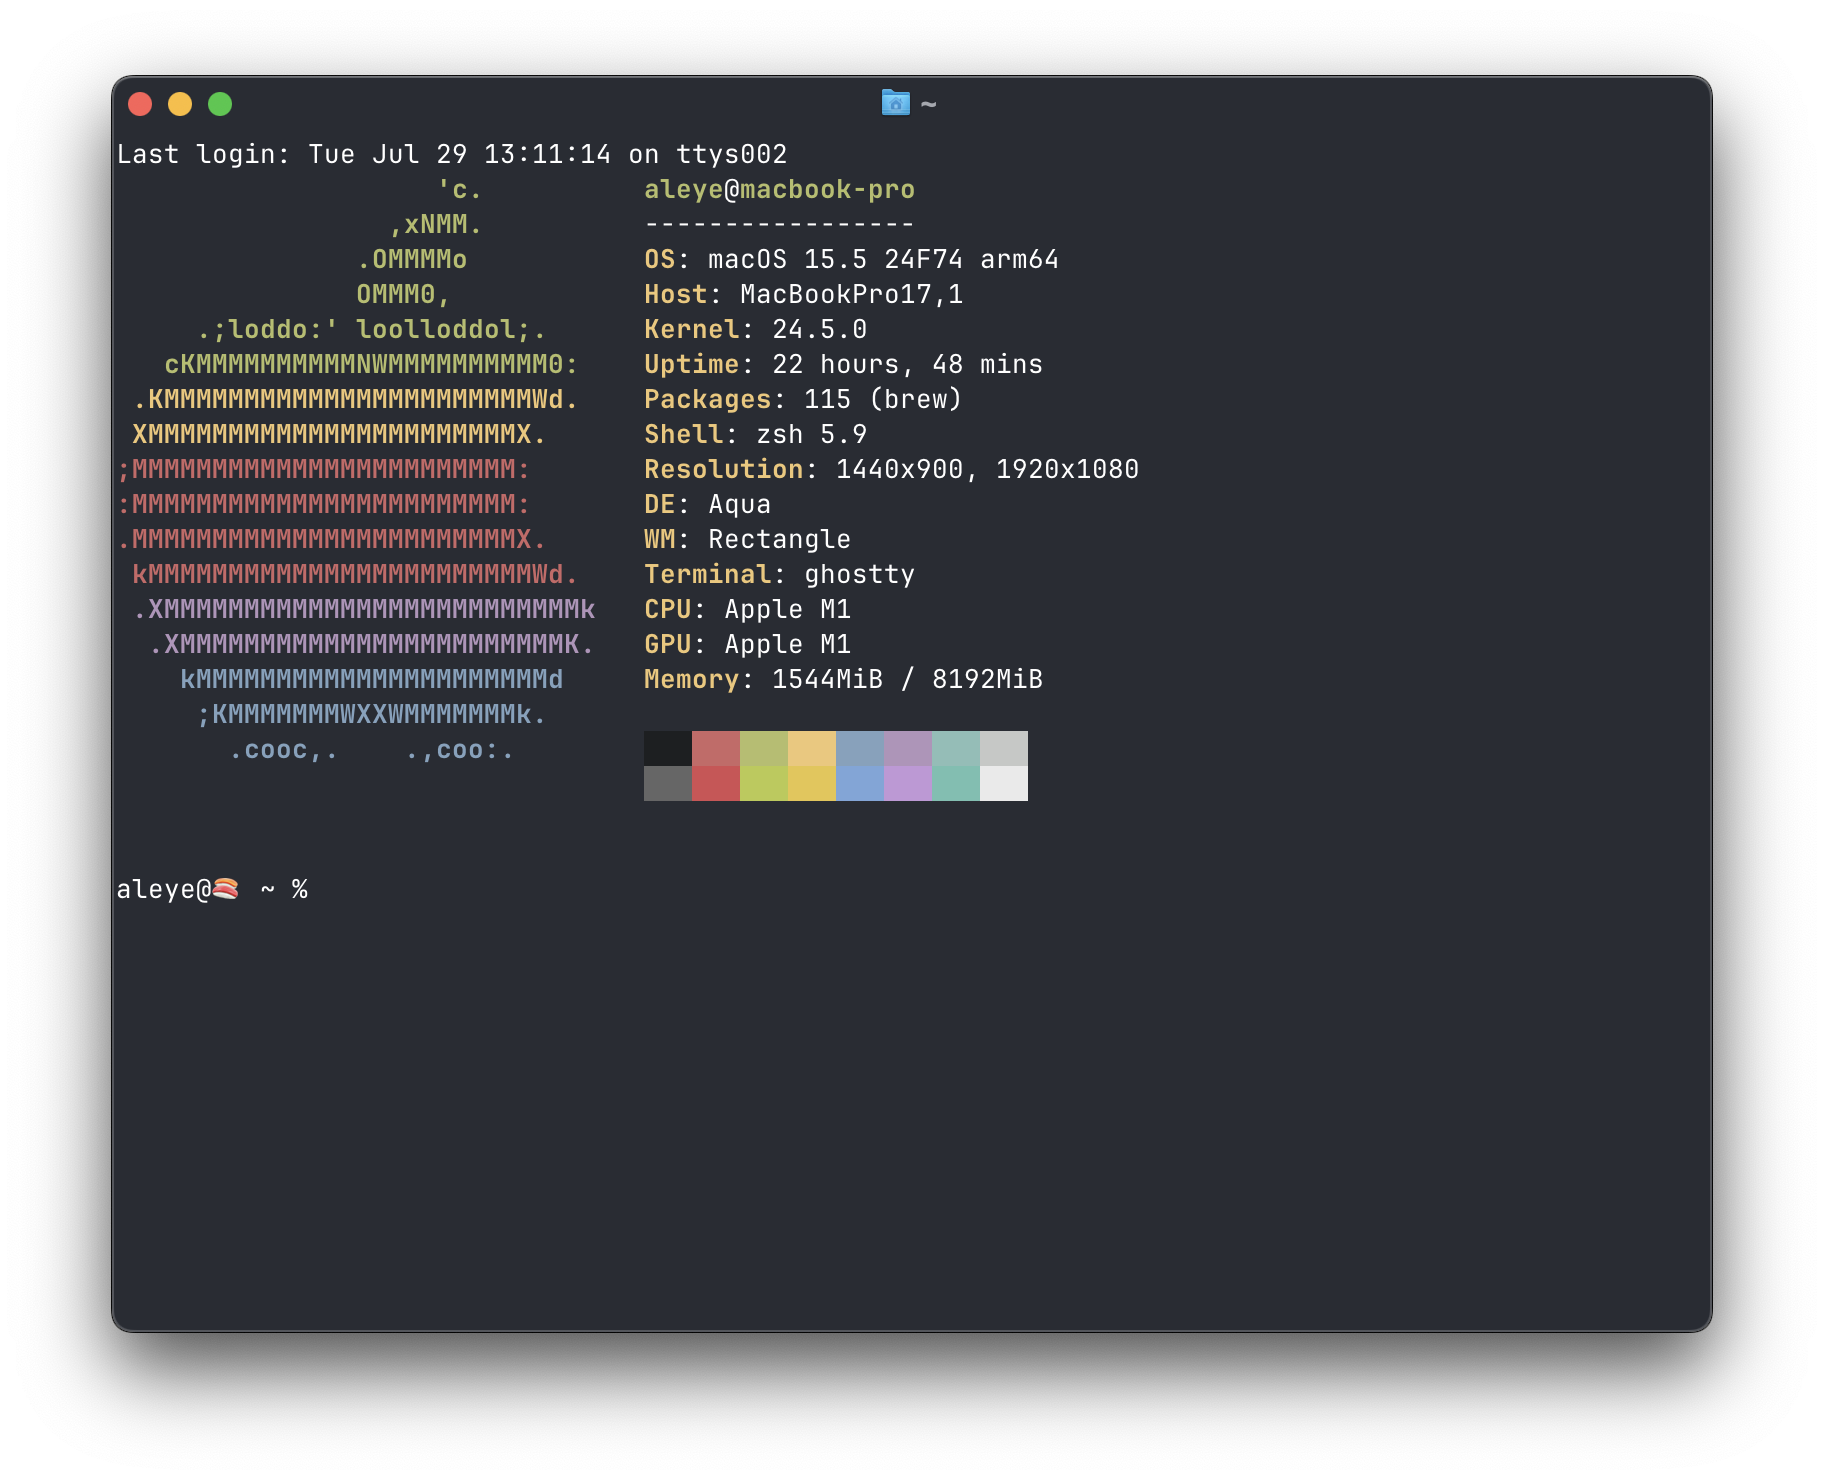
Terminal startup at this point.
Git
Git will be installed by default on your system, after you have installed Homebrew (above) and run brew update to get the apple developer tools installed on your system. You can check with:
~ % git --versiongit version 2.39.5 (Apple Git-154)If for some reason you do not have git, you can proceed with brew install git. Before setting up our config, install diff-so-fancy which provides much better highlighting of diffs.
brew install diff-so-fancy.gitconfig
Then set the following in your ~/.gitconfig.
[user] email = <your email> name = <firstname lastname>[core] excludesfile = ~/.gitignore_global pager = diff-so-fancy | less --tabs=4 -RFX editor = vi[init] defaultBranch = master[pull] rebase = false[fetch] prune = true[credential] helper = store[filter "lfs"] required = true clean = git-lfs clean -- %f smudge = git-lfs smudge -- %f process = git-lfs filter-process[interactive] diffFilter = diff-so-fancy --patch[color] ui = true[color "diff-highlight"] oldNormal = red bold oldHighlight = red bold 52 newNormal = green bold newHighlight = green bold 22[color "diff"] meta = 11 frag = magenta bold func = 146 bold commit = yellow bold old = red bold new = green bold whitespace = red reverse[alias] co = checkout br = branch cm = commit -m s = status p = pull unstage = reset HEAD -- last = log -1 HEAD mr = !sh -c 'git fetch $1 merge-requests/$2/head:mr-$1-$2 && git checkout mr-$1-$2' -Make sure to fill in the details for the [User] section above. For the aliases, they are self explanatory, e.g. you can do git status by typing git s now, which is faster.
The last alias of mr is for GitLab-based repositories and it allows you to check out a merge requests’ code in your local environment, e.g.:
git mr origin 123This will fetch merge request 123 from origin and put it into a new branch called mr-origin-123 in your local environment. This allows for checking out the code easily.
.gitignore_global
For now, exclude .DS_Store from .. everywhere. So let’s do that:
# Add to a global .gitignore fileecho .DS_Store >> ~/.gitignore_global
# Tell git to use this exclude file everywheregit config --global core.excludesfile ~/.gitignore_global
Docker
To get Docker containerisation working we need more than just the cli tools that will come with a brew install docker command. In this case, we don’t actually have a docker daemon running, also known as the docker engine. This allows us to spin up Virtual Machines (VMs) on MacOS for the purposes of containers, also known as virtualisation.
To bridge this gap, there are a few good options for the docker engine component such as:
- Docker Desktop
- Colima
- Podman
- Rancher Desktop
Here’s a summary table of some features:
| Feature | Docker Desktop | Colima | Podman | Rancher Desktop |
|---|---|---|---|---|
| Open Source | ❌ | ✅ | ✅ | ✅ |
| macOS Support | ✅ | ✅ | ✅ | ✅ |
| GUI | ✅ | ❌ | ❌ | ✅ |
| VM Support | ✅ | ✅ | ✅* | ✅ |
| Docker Compose | ✅ | ✅ | ✅** | ✅ |
| Resource Control | ✅ | ✅ | ✅ | ✅ |
| Kubernetes | ✅ | (via k3s) | (via k3s) | ✅ |
| Apple Silicon | ✅ | ✅ | ✅ | ✅ |
| Rootless Mode | ❌ | ✅ | ✅ | ✅ |
| Notes | Most popular, easy setup | Lightweight, fast | CLI-focused, advanced | All rounder |
Legend:
- ✅* Podman uses a VM on macOS for Linux containers.
- ✅** Podman supports Compose v2 via podman-compose (not 100% feature parity with Docker Compose).
Recommendations
For personal use, I recommend using Docker Desktop due to its ease of setup and no-fuss operation. Usually Docker Desktop will open on start up and be available in the background for any docker commands on the cli. It also installs all the necessary scripts, so you can run docker commands after.
For work, I recommend using Rancher Desktop due to its free and open source nature. It’s easy to set up as well, but there’s slightly more overhead and in practice it’s a little less flush than Docker Desktop. However, of course if your company is already paying for Docker Desktop, feel free to stick with that.
A note on Colima: Initially I was excited to hear about colima, and it was (to their credit) super easy to set up and use out of the box. However, I found that while running the functional tests of a springboot application, the colima backend fell over and docker commands were giving EOF errors which crashed the application. YMMV, but I cannot recommend Colima in good faith at this date.
So finally, verify you setup is working via:
docker psCONTAINER ID IMAGE COMMAND CREATED STATUS PORTS NAMESSDKs
Tips of how to install various SDKs.
Java
To install Java 17, you can install the open source version via:
brew install openjdk@17sudo ln -sfn /opt/homebrew/opt/openjdk@17/libexec/openjdk.jdk /Library/Java/JavaVirtualMachines/openjdk-17.jdkThe last line there is a required symlink, but brew will tell you what to do. Once this is done, check the installation was successful via:
aleye@🍣 ~ % javac --versionjavac 17.0.14Maven
Once Java is installed, you can go ahead and install Maven (or Gradle if you prefer) via Homebrew.
brew install mavenOr, if you prefer to install a specific version you can also install Maven manually:
- Go to the maven website. Find the version you want to install, and update the URL in the following:
# Download selected Maven version from the website, e.g.# https://repo.maven.apache.org/maven2/org/apache/maven/apache-maven/3.6.3/tar xzvf Downloads/apache-maven-<version>-bin.tar.gz- Add following to your ~/.zshrc
export MAVEN_HOME=~/apache-maven-3.6.3export $PATH=$PATH:$MAVEN_HOME/bin- Restart your terminal or load the terminal with the latest shell profile
~/.zshenv source~/.bash_profile source- Confirm your installation with
mvn -version
Python
Sometimes you’ll need different versions of Python running on your macbook. E.g., lots of things don’t play nice together, and sometimes it’s more complicated than a dockerfile setup. For that, let’s use the Python Version Manager pyenv.
# install pyenvbrew updatebrew install pyenv
# install specific python versionpyenv install 3.12.9
# set globallypyenv global 3.12.9
# (optional) or locally, this directorypyenv local 3.12. 9
Set your zsh config to pick up the shims. See the official repo guide for more info:
echo 'export PYENV_ROOT="$HOME/.pyenv"' >> ~/.zshrcecho '[[ -d $PYENV_ROOT/bin ]] && export PATH="$PYENV_ROOT/bin:$PATH"' >> ~/.zshrcecho 'eval "$(pyenv init - zsh)"' >> ~/.zshrcAfter adding the zsh config and restarting your shell or source ~/.zshrc, make sure everything is set up properly:
# check: pyenvpyenv version3.12.9 (set by..)
# check pythonpython --version3.12.9
The benefit now of pyenv is that you can install another version of python trivially by following the above instructions, and have them co-exist on the same machine without issues.
Virtual Environments
I always use a virtual environment for new projects, so that the global python space does not get broken or polluted. You can do this via:
python -m venv venv/source venv/bin/activateThis creates a virtual environment in the venv/ folder of your directory. Once you have activated the enviornment, you will see a (venv) on the left of your terminal prompt to show this.
If you want to exit the virtual env you can perform deactivate as the command.
Node
Use the Node Version Manager (NVM) instead of the default installation. This will allow you to easily manage different versions of node on the one machine without any hassle.
From the official site above, install via:
curl -o- https://raw.githubusercontent.com/nvm-sh/nvm/v0.40.3/install.sh | bashNote that you can update the version number in that URL based on what becomes available in the future. Then, use it via:
$ nvm use 16Now using node v16.9.1 (npm v7.21.1)$ node -vv16.9.1
$ nvm use 14Now using node v14.18.0 (npm v6.14.15)$ node -vv14.18.0
$ nvm install 12Now using node v12.22.6 (npm v6.14.5)$ node -vv12.22.6
IDEs
Here are some useful Integrated Development Environments (IDEs) with some reasonable settings I use.
VSCode
Firstly, get the code command for your cli. This will allow you to open files and folders from your terminal via code <folder> for example.
Install code command
Get command palette: ⌘+Shift+P
- Shell Command: Install ‘code’ command in PATH
Extensions
- Docker
- Git Blame
- Python (installs the following)
- isort
- Pylance
- Python Debugger
- Python Indent
- mypy (Python type checker)
- Black Formatter (Python formatter)
- Remote Explorer
- Remote - SSH
- Rainbox CSV
- Excel Viewer
- Ayu (theme)
- Serendipity v1 (theme)
- Swagger Viewer
- Thunder Client (API)
- XML Tools
- YAML
settings.json
You can include a settings file in your repository under .vscode/settings.json, which will override defaults in your global settings. Here are some settings I use for python, for example:
{ "[python]": { "editor.defaultFormatter": "ms-python.black-formatter", "editor.formatOnSave": true, "editor.codeActionsOnSave": { "source.organizeImports": "explicit" }, }, "isort.args": ["--profile", "black"], "files.exclude": { "**/__pycache__": true, "**/.pytest_cache": true, }, "mypy.runUsingActiveInterpreter": true}These settings will auto-sort your imports at the top of your file, and also apply formatting by the black formatter automatically on save. It will also ignore the auto-generated __pycache__ folders and files, and use the mypy type checker as well.
For when you want to write documents in VSCode (or derivatives), you can disable the constant word suggestions that pop-up for every word you type via the following setting:
"editor.quickSuggestions": { "other": "off" }I like to do this when writing notes and articles in MD, for example.
Thunder Client
The thunder client extension allows you to easily sent API requests from within VSCode. To migrate your requests around to a different machine you can follow these steps.
The requests data files default storage location paths:
# Windows%APPDATA%\Code\User\globalStorage\rangav.vscode-thunder-client
# Linux~/.config/Code/User/globalStorage/rangav.vscode-thunder-client
# Mac/Users/userName/Library/Application Support/Code/User/globalStorage/rangav.vscode-thunder-client/
# VSCode Server (remote):~/.vscode-server/data/User/globalStorage/rangav.vscode-thunder-client- Remember to replace
userNamewith your actual username. - Get the
thunderActivity.jsonfile and copy it to the location of this folder on your Mac.
IntelliJ IDEA
This is the best IDE for any Java development imo.
- Project settings > Project
- SDK: Java 17 (select Homebrew option from the dropdown menu)
- Language level: 17 (select LTS)
- Maven:
- Add any of your custom settings to:
~/.m2/settings.xml
- Add any of your custom settings to:
- Docker:
- Settings >
- Build, Execution, Deployment >
- Docker
- Name: Docker
- Detect executable paths automatically (tick yes)
- Connect to Docker daemon with: Docker for Mac
- Use default
unix:///var/run/docker.sock - Ensure ‘Connection successful’ is shown near the bottom of the page
- Virtual machine path: /Users
- Local path: /Users
- Docker
- Build, Execution, Deployment >
- Settings >
- Plugins
- Jakarta EE: Web Services (JAX-WS)
- AWS Toolkit
- Karate (Karate Labs)
- Mypy (Official)
- Python
- Python Community Edition
- Profile (for Spring Boot, project dependent)
- errorprone
- native
- nativeTest
- nexus
- process-exec-runner (tick)
- sonar (tick)
- sourceclear (tick)
- spring-boot-runner (untick)
- swaggerhub (tick)
You can also use IntelliJ IDEA as your IDE for Python development, instead of installing PyCharm as well. But, the experience is slightly different - for example, you will need run configs imported for each repository.
Disabling code suggestions
By default, IntelliJ IDEA now ships with AI suggestions that pop-up inline as you type. This can be disturbing or unwanted such as when you are trying to learn a particular concept. To disable this feature:
Settings > Editor > General > Inline Completion
Untick the option for ‘Enable local Full Line completion suggestions’.
Browser
For my browser I use Firefox. It’s a good alternative to Chromium-based browsers such as Google Chrome and derivatives, which see the Chromium engine have significant dominance in the browser space. With the latest updates to Mainfest V3 that removes some ad blocker features, I think it’s also a good time to recommend alternative browsers as well. However, safe to say that only some features may work on Chrome, and it’s always good to have to test out a different browser - so no harm there. Finally, Safari is a good bet on MacOS as well, since it is blazing fast. However, I find it to be a little harder to use in terms of extensions - YMMV.
So my recommendation for Firefox is:
- Container support
- You can easily separate browser history, cookies, login etc. with Containers built-in
- Adblockers supported (no manifest V3 reworks)
- Free and open source
- Good developer community (see MDN Web Docs)
Extensions
Here are some favourite extensions:
- uBlock Origin (Adblocker for non-chrome browsers)
- Adguard (Adblocker for chrome/non-chrome browsers)
- Dark Reader
- LastPass (Password Manager)
- Privacy Badger
- Facebook Container (Firefox only)
- Return YouTube Dislike
- ClearURL
- Don’t Track Me Google
Since I am learning Japanese, here are some recommendations for language learners:
- Language Reactor (subtitles on Netflix and other sites)
- jisho-pitcher (pitch accent)
- Yomitan Popup Dictionary
TUIs
Terminal User Interfaces.
Spotify TUI
For Terminal User Interfaces (TUIs), one I use is spotify-tui. This allows you to have Spotify running and playing music in your terminal with the spt command, for example:
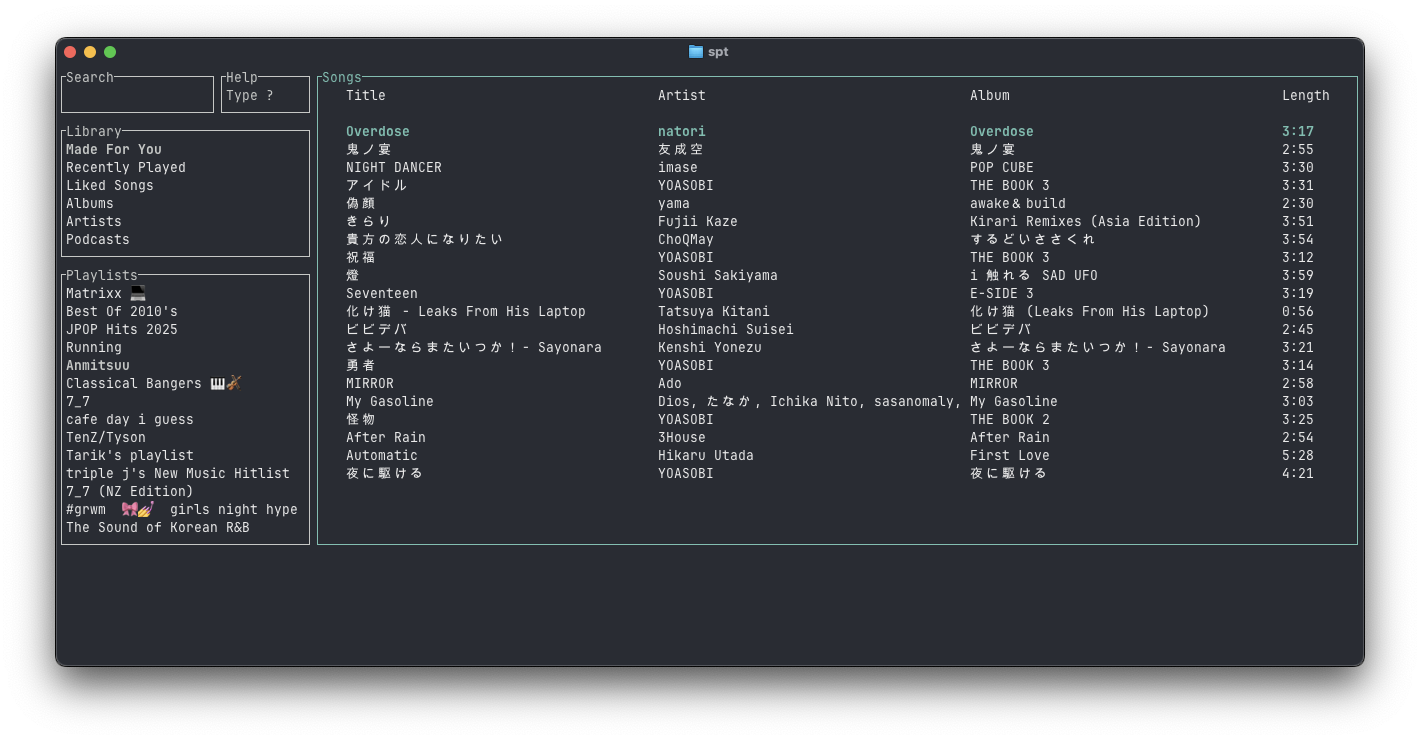
Spotify TUI in action.
Quick setup
To get this working, we will need a daemon running for Spotify. Normally, you can just use the Spotify native UI application running on MacOS. If you do already use the Spotify native app, I recommend the following settings:
Spotify settings
- Settings
- Audio quality:
- Streaming quality: Very High
- Download quality: Very High
- Auto adjust quality: Off
- Normalize volume: On
- Proxy Settings:
- Autodetect settings
- Audio quality:
Installation
Next, you’ll need to install spotify-tui and add spt as an app so that we can get the stream into your terminal.
brew install spotify-tuiLink account
Then, following the instructions in the repo:
spotify-tui needs to connect to Spotify’s API in order to find music by name, play tracks etc.
Instructions on how to set this up will be shown when you first run the app.
But here they are again:
- Go to the Spotify dashboard
- Click Create an app
- You now can see your Client ID and Client Secret
- Now click Edit Settings
- Add
http://localhost:8888/callbackto the Redirect URIs - Scroll down and click Save
- You are now ready to authenticate with Spotify!
- Go back to the terminal
- Run
spt - Enter your
Client ID - Enter your
Client Secret - Press enter to confirm the default port (8888) or enter a custom port
- You will be redirected to an official Spotify webpage to ask you for permissions.
- After accepting the permissions, you’ll be redirected to localhost. If all goes well, the redirect URL will be parsed automatically and now you’re done. If the local webserver fails for some reason you’ll be redirected to a blank webpage that might say something like “Connection Refused” since no server is running. Regardless, copy the URL and paste into the prompt in the terminal.
And now you are ready to use the spotify-tui 🎉
You can edit the config at anytime at:
${HOME}/.config/spotify-tui/client.yml
Optional: Without the Spotify App
You may have asked yourself “is there a way to cut out the Spotify app as the middleman in this setup?”, and the answer is yes! For that type of set up, you’ll still need a Spotify daemon running in the background, which you can get from spotifyd. Start with:
brew install spotifydThen you can follow the instructions on the repo to authenticate to Spotify. Once this is done, you won’t have to log in again, and can enjoy streaming music from right in your terminal. Nice.
Other Apps
Here are some other apps I recommend. The below are Free and Open Source (FOSS):
- GIMP (GNU-license image editor)
- Bruno (API client)
- Rectangle (window resize and snap)
- Anki (All around elite SRS for learning)